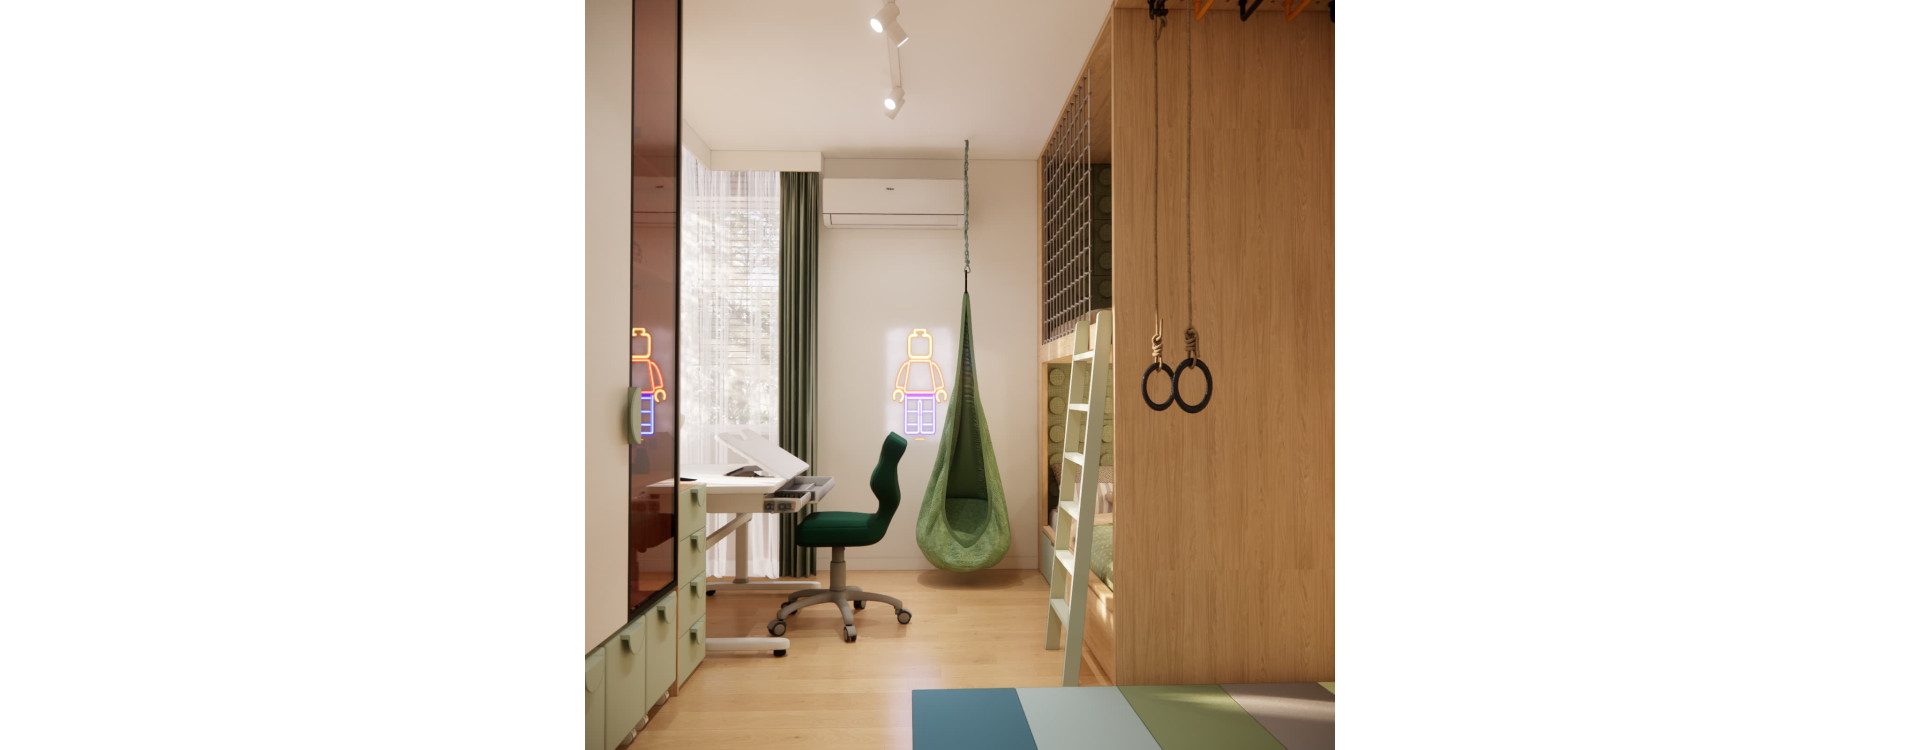
A hideaway upstairs, a cosy bed below, space for favourite models and a climbing ladder for active play. This 15m2 room design for a 7-year-old boy in Pruszków combines all these features with a study area and generous storage. At Fabryka Projektów, we paired light-coloured cabinet fronts with wood grain and sage green, adding a playful touch through building-block details and travel-themed decoration on the upper level.
How can so many functions fit into 15m2? In this design, we made use of the room’s height, positioned larger furniture along the walls and divided storage between closed wardrobes, low drawers and display cabinets. This gives every part of the room a clear purpose.
The images shown are interior design visualisations, not photographs of a completed renovation.
What will you learn from this room design?
- How to arrange study, rest, storage and active play areas in a 15m2 room.
- How a two-level built-in structure with a loft contributes to the layout.
- How to combine model displays with storage for everyday belongings.
- How to pair sage green with light-coloured furniture and wood.
- What to include in the budget for a room with extensive fitted furniture and climbing equipment.
A 15m2 room for a 7-year-old – the starting point for the design
At seven, schoolwork becomes part of a child’s daily routine, but play remains just as important. In this design, the desk has a dedicated place alongside areas for resting, building and movement. We see a school-age child’s room as more than just a bed, wardrobe and workspace.
A large window defines the bright study area. The two-level structure occupies one of the main walls, while tall wardrobes and display cabinets form another distinct section of fitted furniture. The open floor area in front of the climbing ladder is reserved for mats. With this layout, it is important to consider both the footprint of the furniture and the space needed to use it: pulling out a chair, opening a wardrobe or climbing the ladder.
| Design element |
Solution used in the Pruszków room |
| Floor area and occupant |
15m2, a 7-year-old boy |
| Rest |
A lower bed with cushions, an upper area behind netting and a hanging pod chair |
| Study |
A desk by the window, a chair and nearby drawers |
| Active play |
A wall-mounted climbing ladder, overhead bars, rings and mats |
| Storage |
Tall wardrobes, lower drawers and illuminated display cabinets |
| Colour palette |
A light base, wood grain, sage and deeper green, with yellow and black details |
A loft with a bed below – a two-level built-in structure
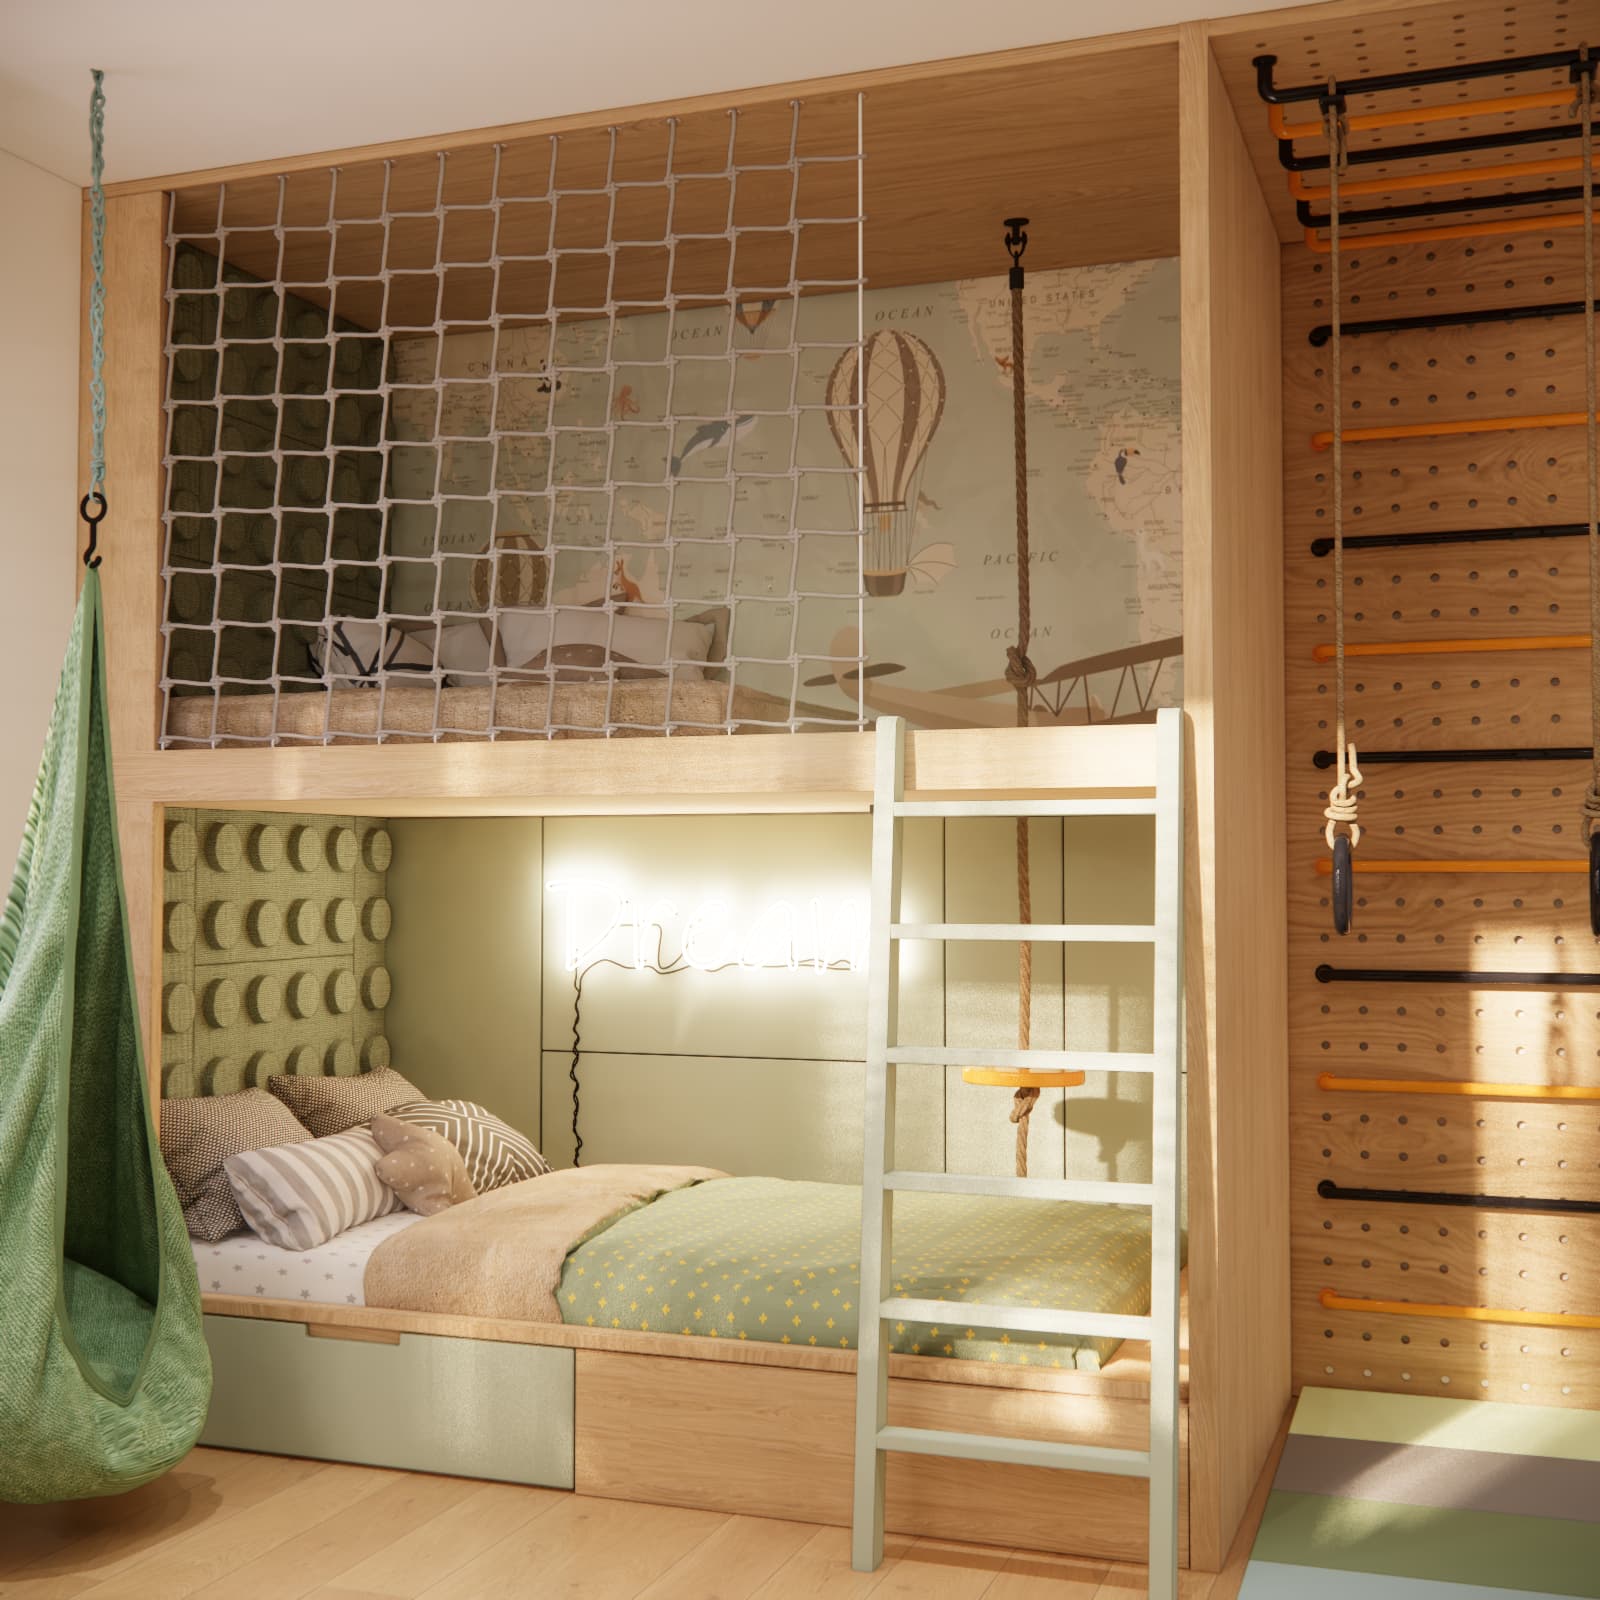
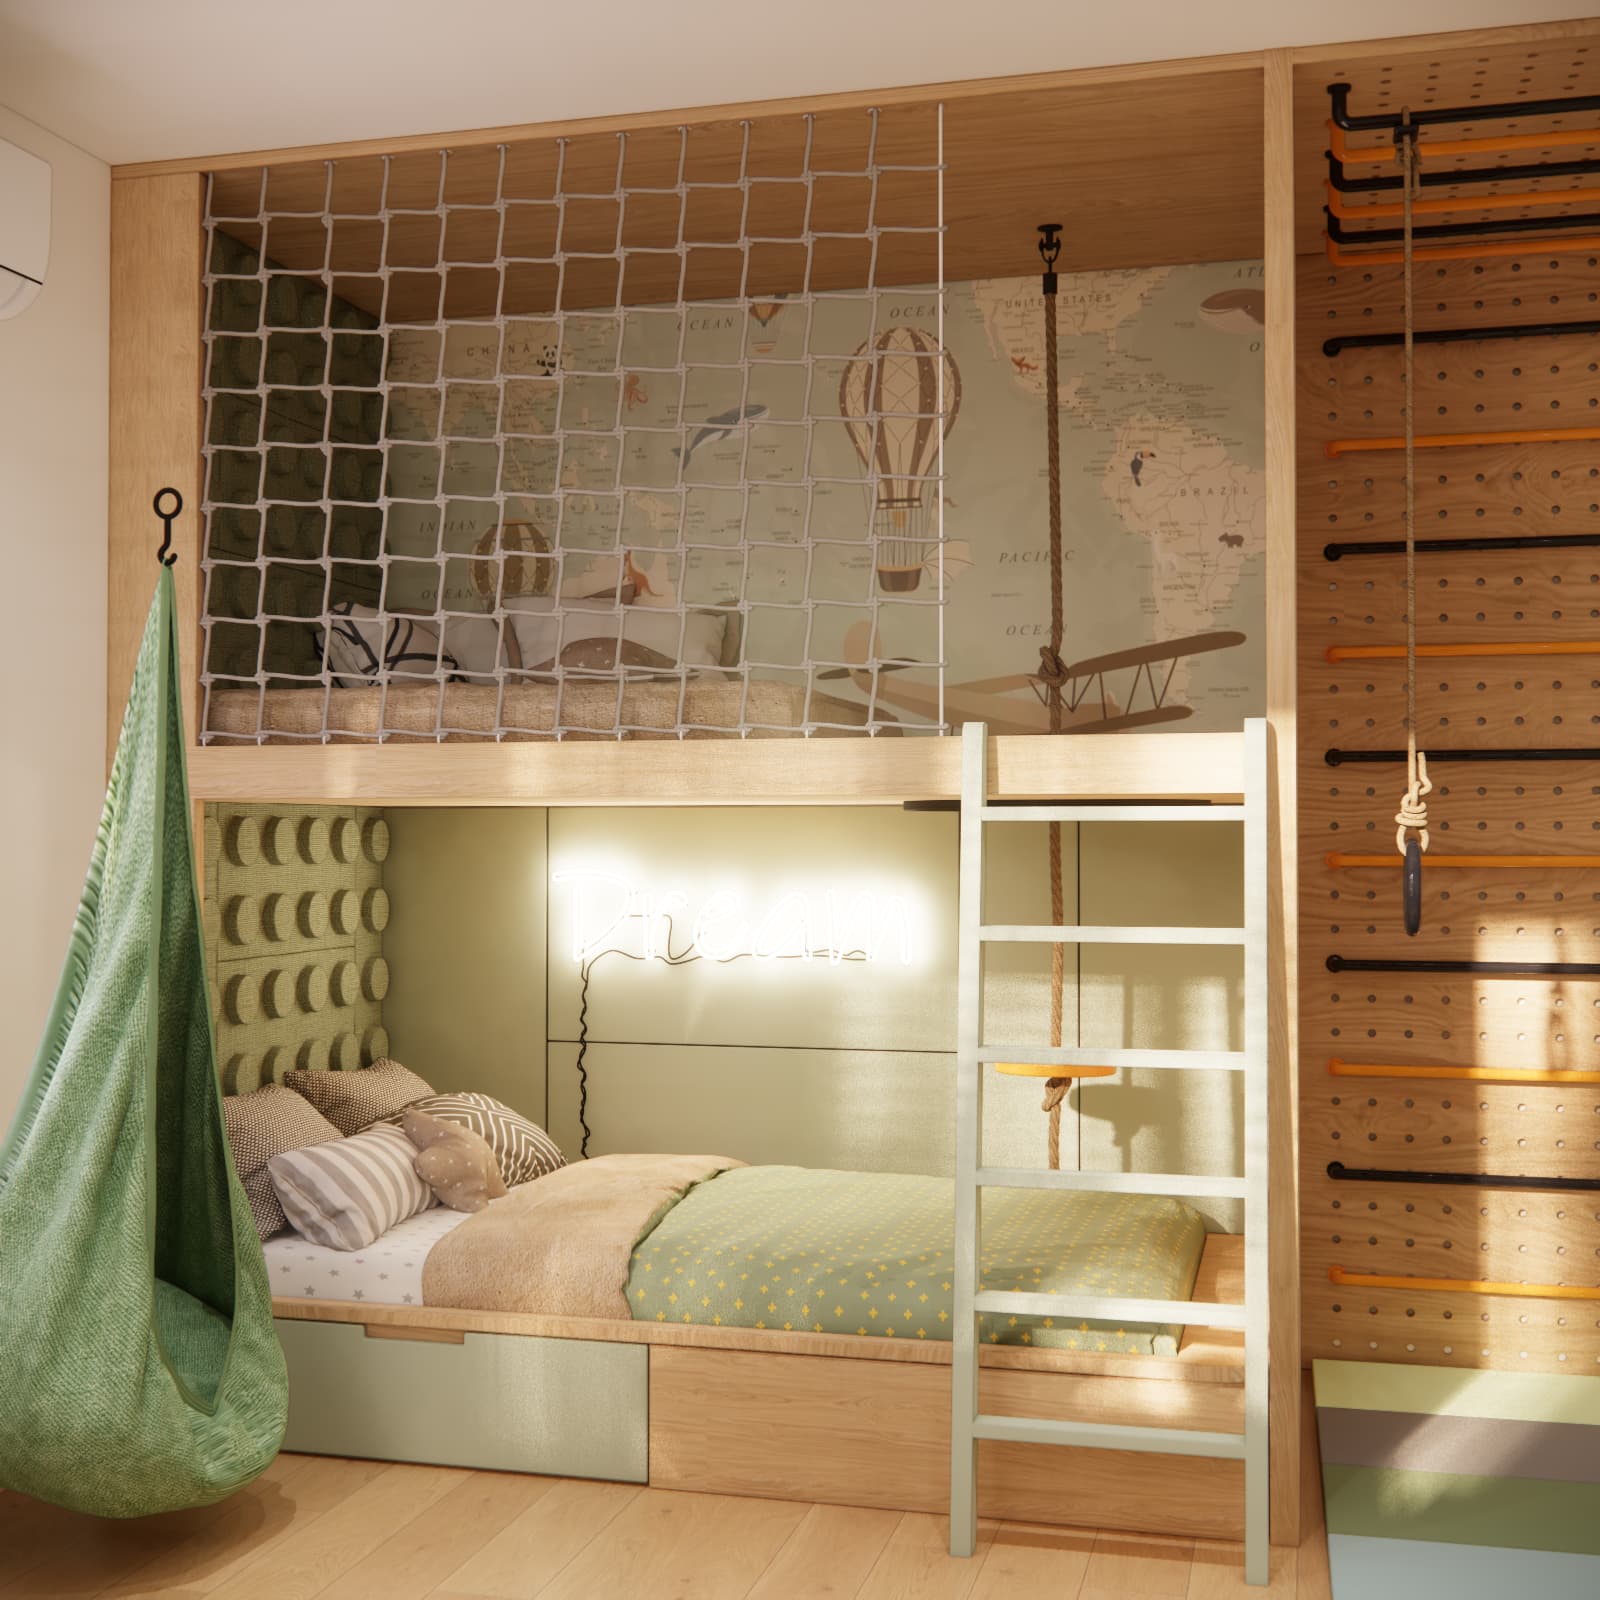
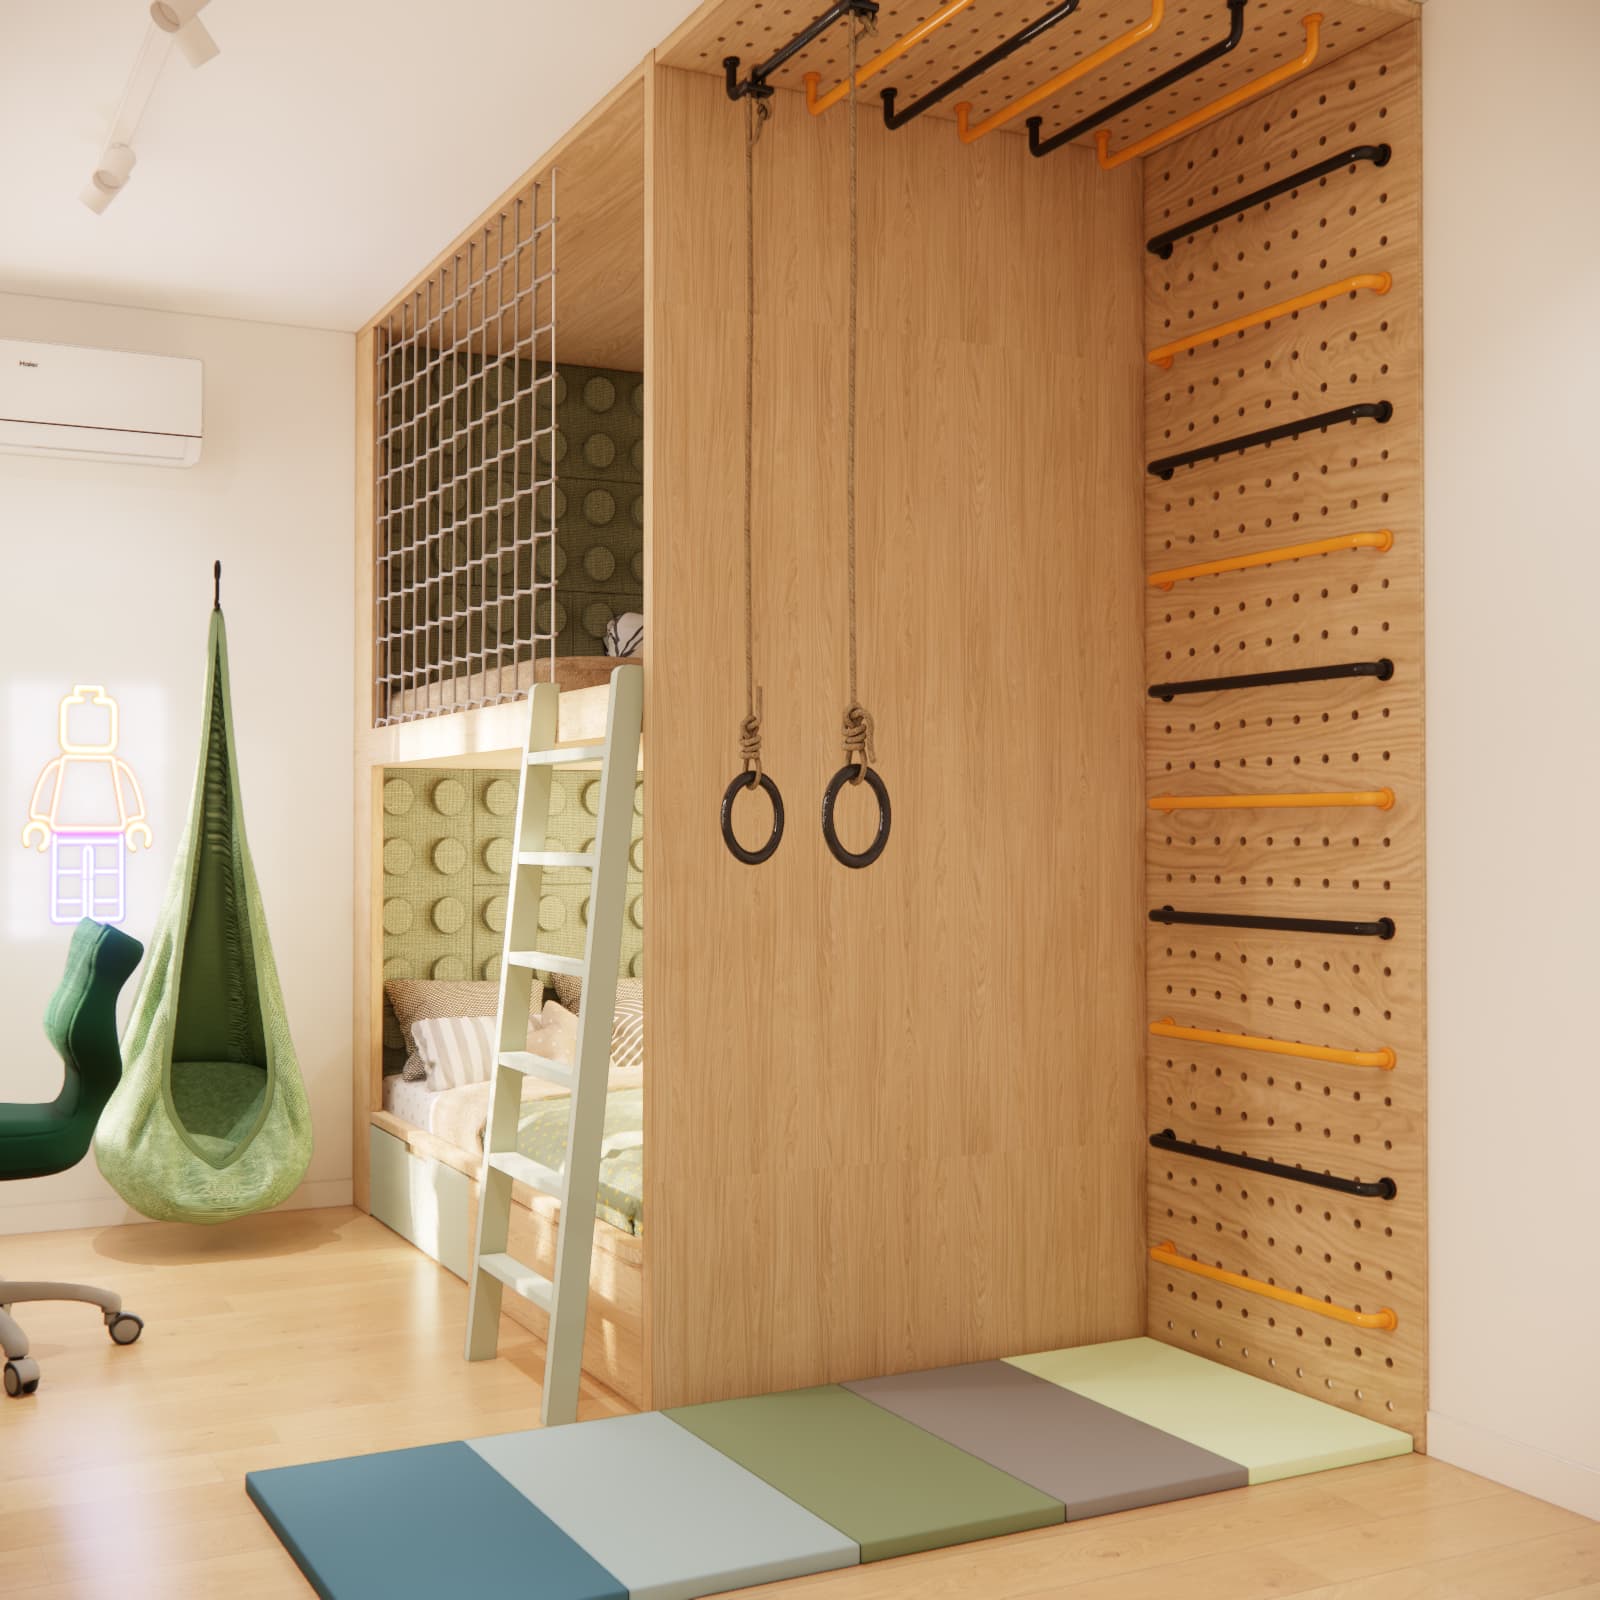
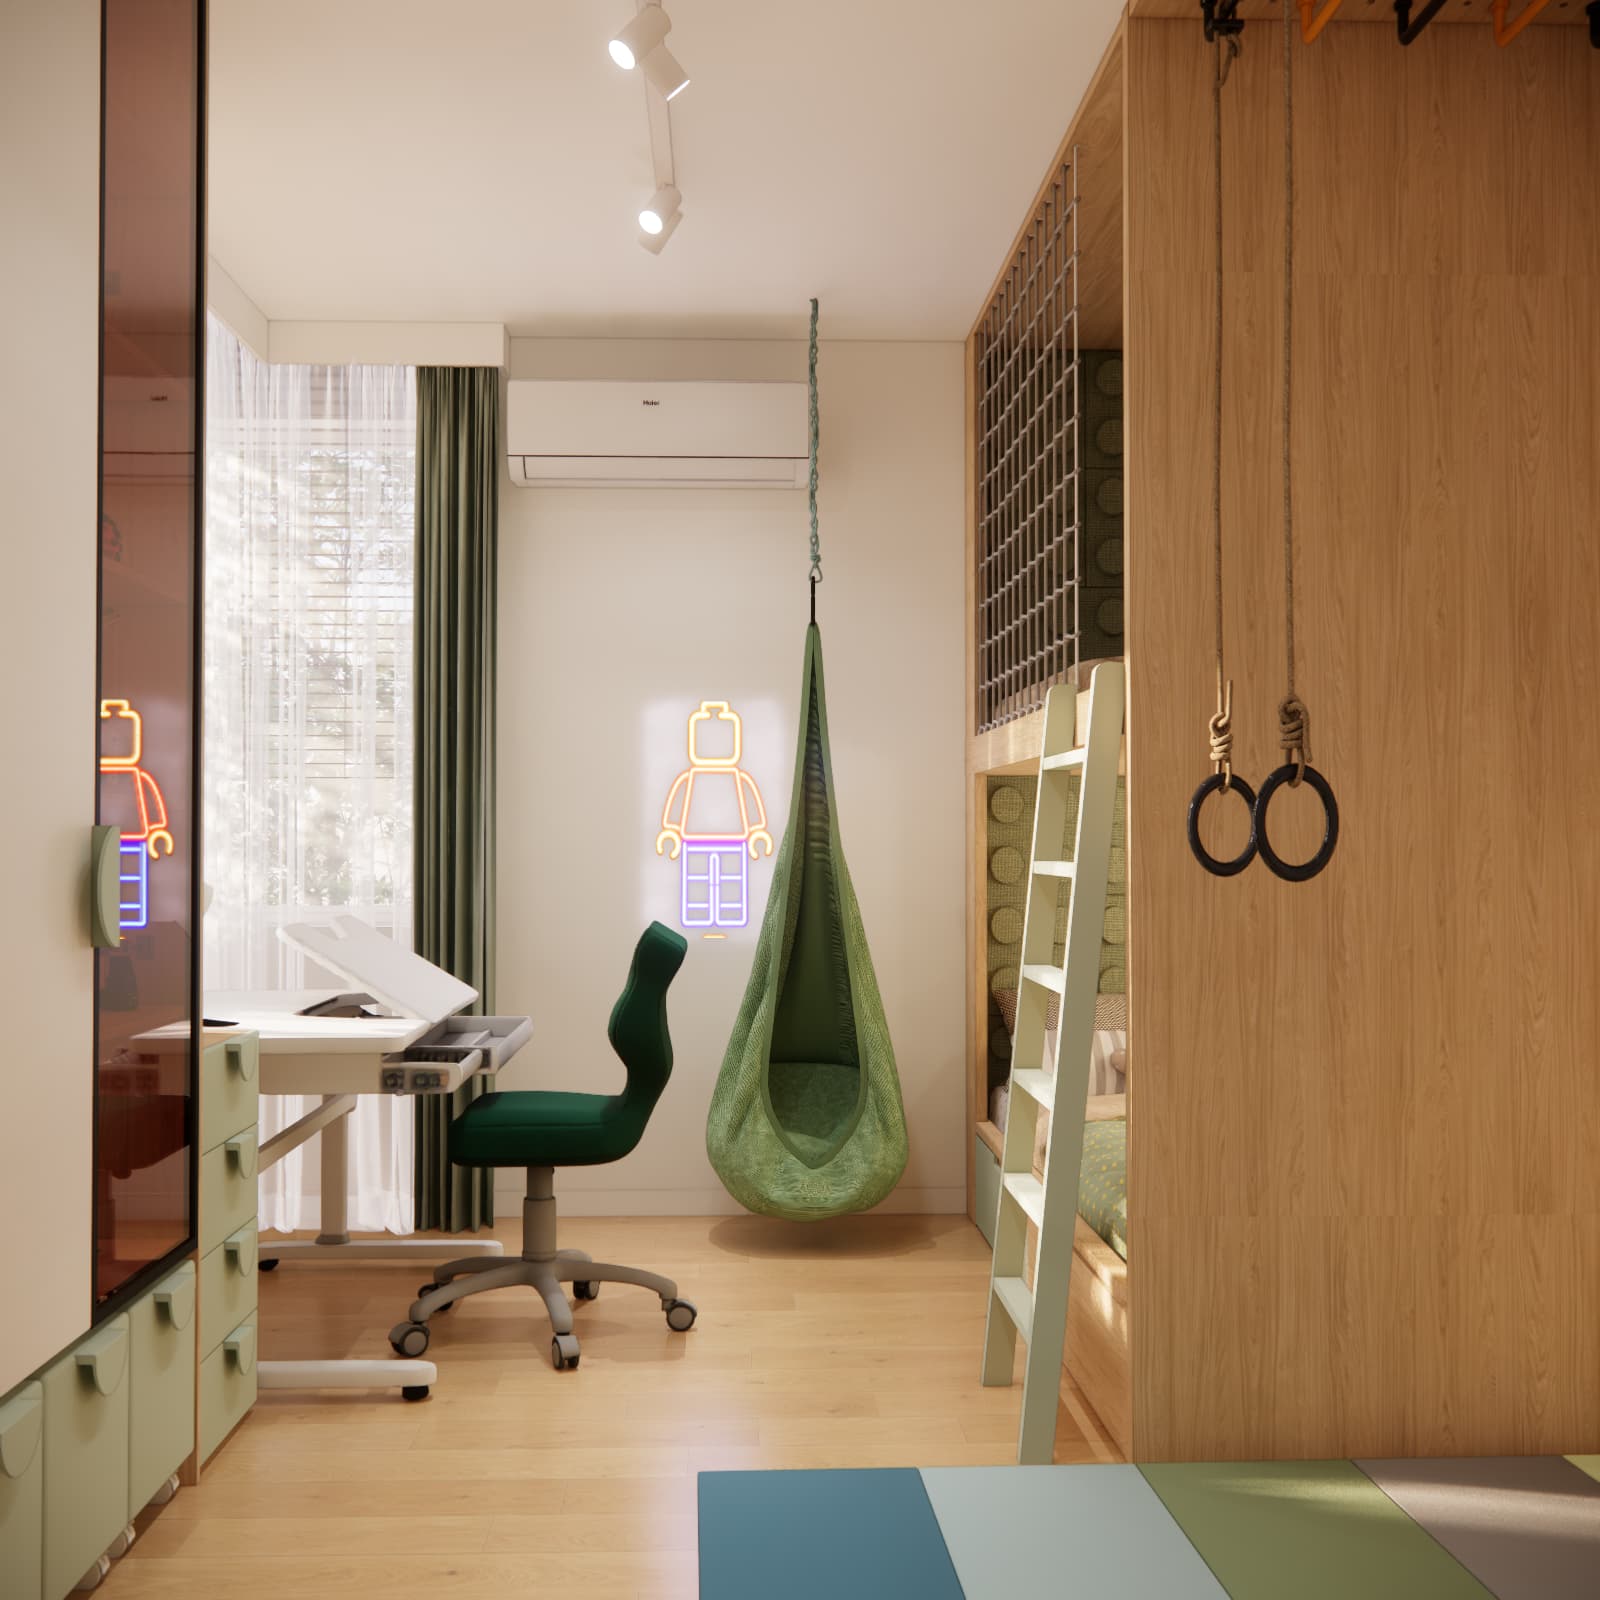
The most distinctive feature of the design is the tall structure with a wood-grain finish. The lower bed sits in a recess surrounded by green panels and soft furnishings. Above it, we planned an additional area with netting facing the room, accessed by a ladder in a pale green shade.
The upper level features a decorative map, a hot-air balloon and an aeroplane. The lower level is more understated: cushions, calm bedding colours and lighting within the recess create a cosy nook. A pattern resembling the studs on building blocks adds a distinctive detail to the green surface beside the bed.
A note from our team: making use of the room’s height allows different activities to be separated without adding more furniture at floor level. However, this does not mean that a loft can be replicated in every room. Accurate height measurements, a check of the available space on both levels, and a properly developed structure and safety features are essential.
We show a different way to use two levels in our 17m2 room design with a loft and gaming area. It is worth comparing the purpose of each zone rather than choosing solutions based on floor area alone.
A climbing ladder, rings and hanging pod chair – space for movement and rest
Beside the bed is a climbing ladder with yellow and black rungs, set against a perforated panel with a wood-grain finish. The arrangement continues overhead with additional bars, while hanging rings complete the active play area. On the floor, we have shown a set of mats in muted shades of green, blue and grey.
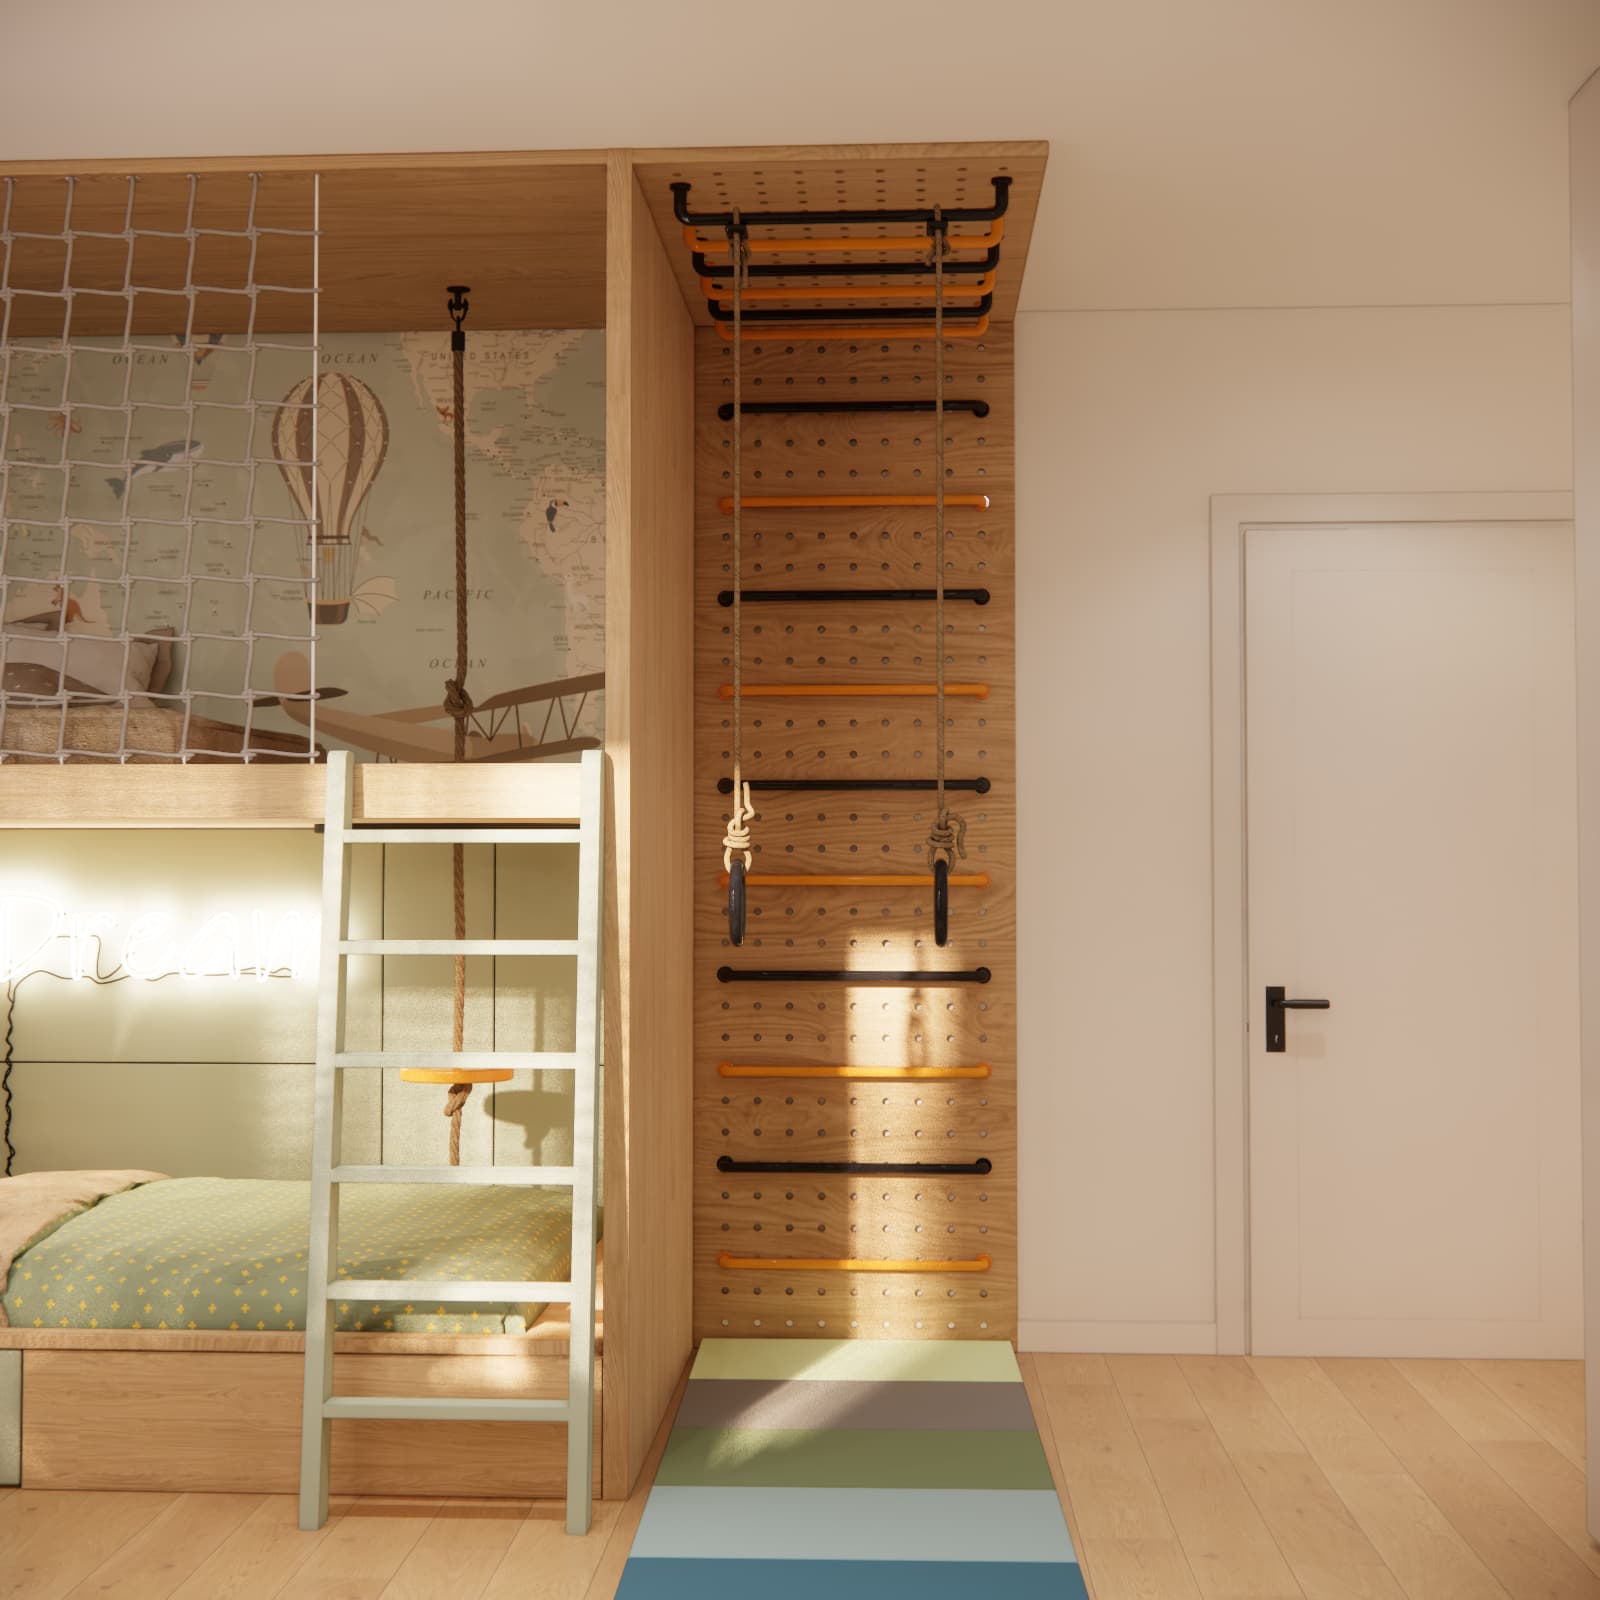
This type of equipment needs clear space around it. When adapting the idea to another room, it is important to account for the child’s range of movement and the distance from furniture, doors and windows. The structure, fixings, upper-level safety features and impact protection must be selected for the specific system and installation conditions. A visualisation alone does not confirm their technical specifications.
We placed a green hanging pod chair near the window. It creates a separate nook for quiet relaxation and introduces a soft shape among the rectangular furniture. Its position and swinging range also need to be considered when planning circulation space.
A desk by the window – a workspace for the first years of school
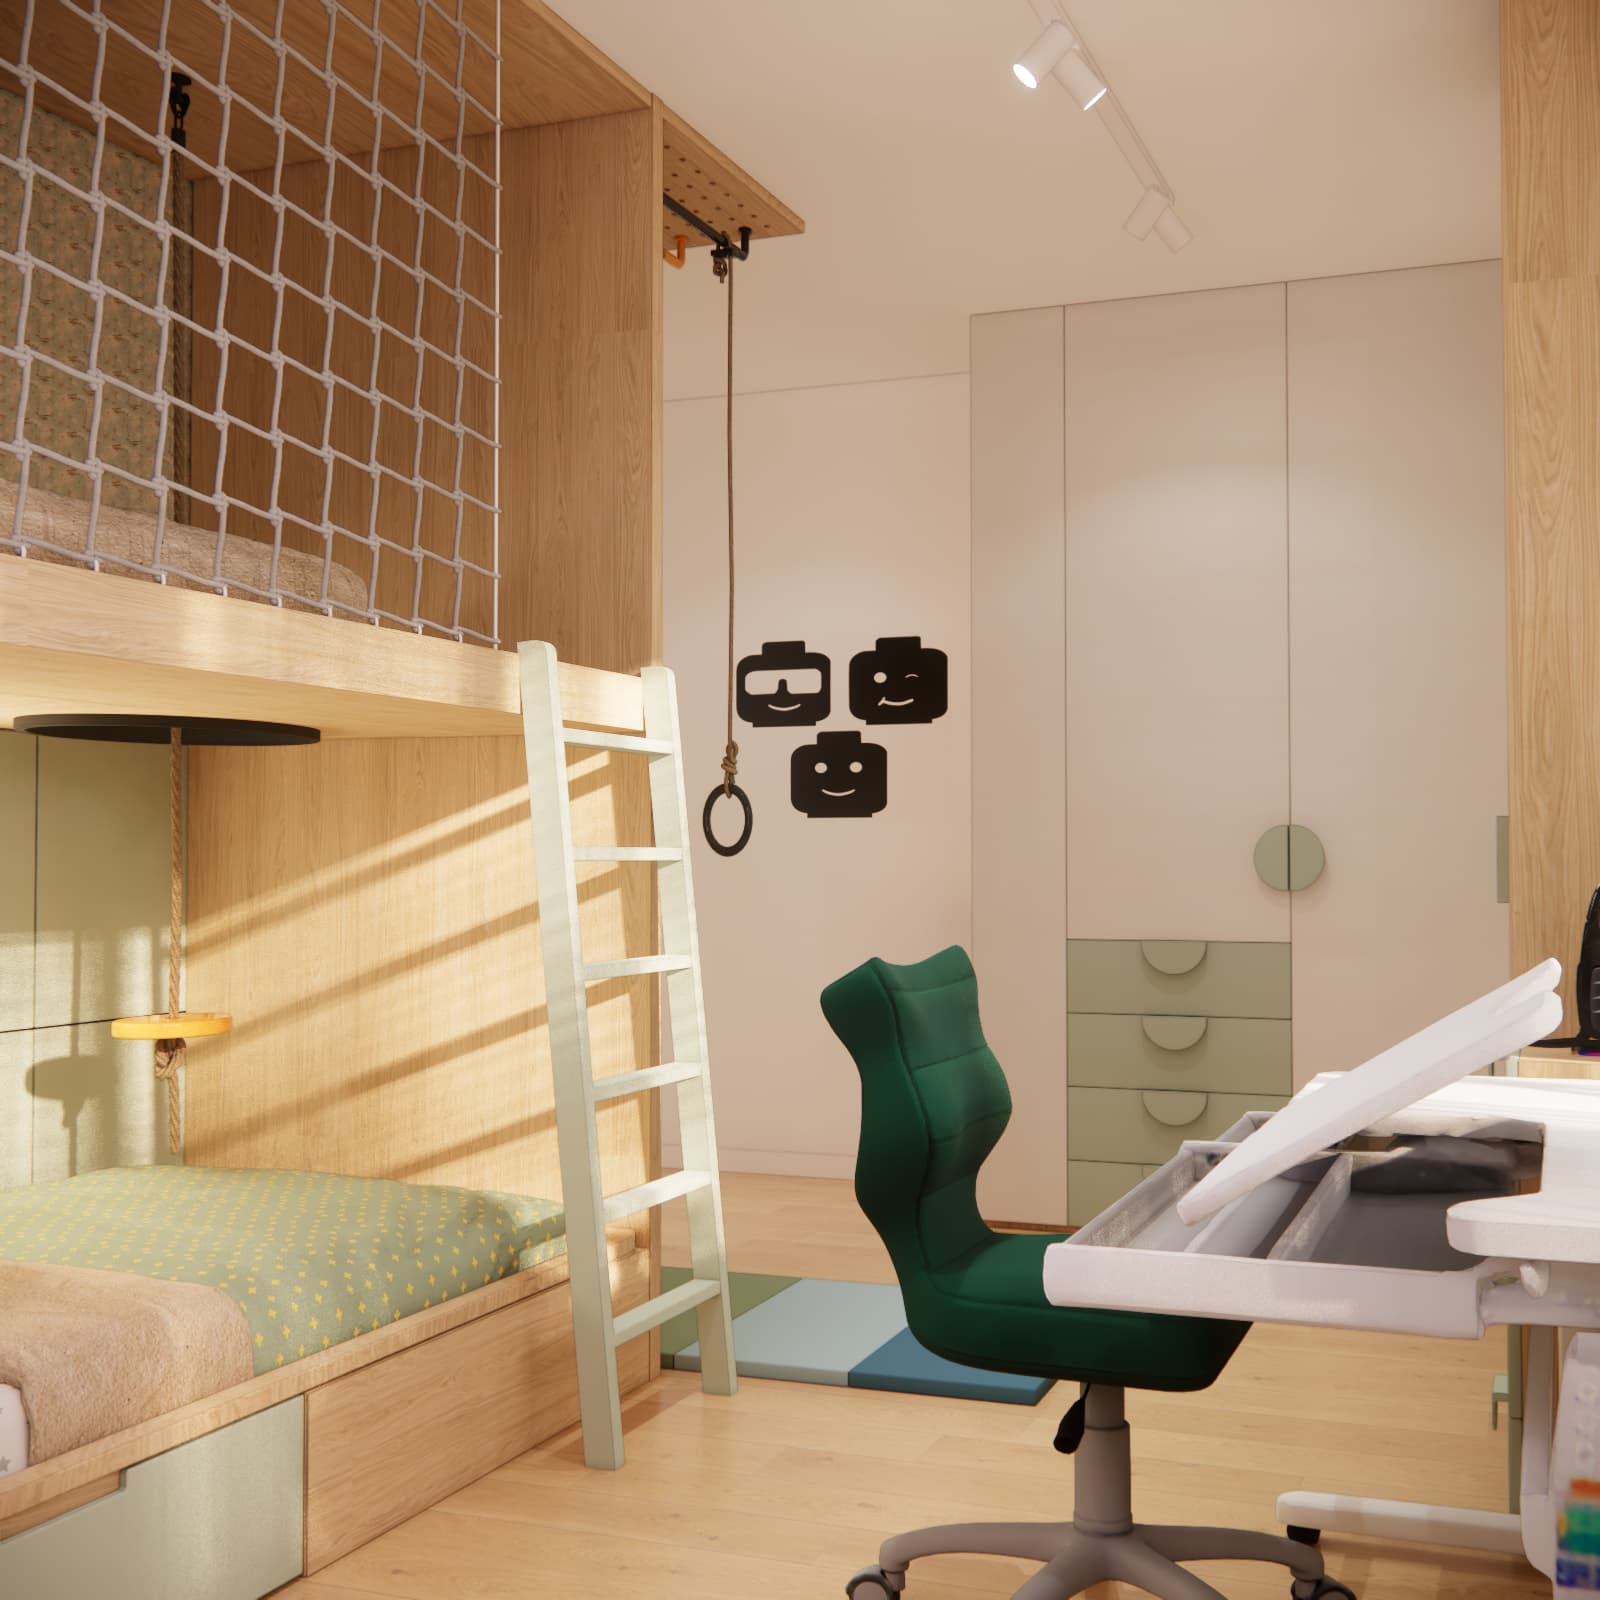
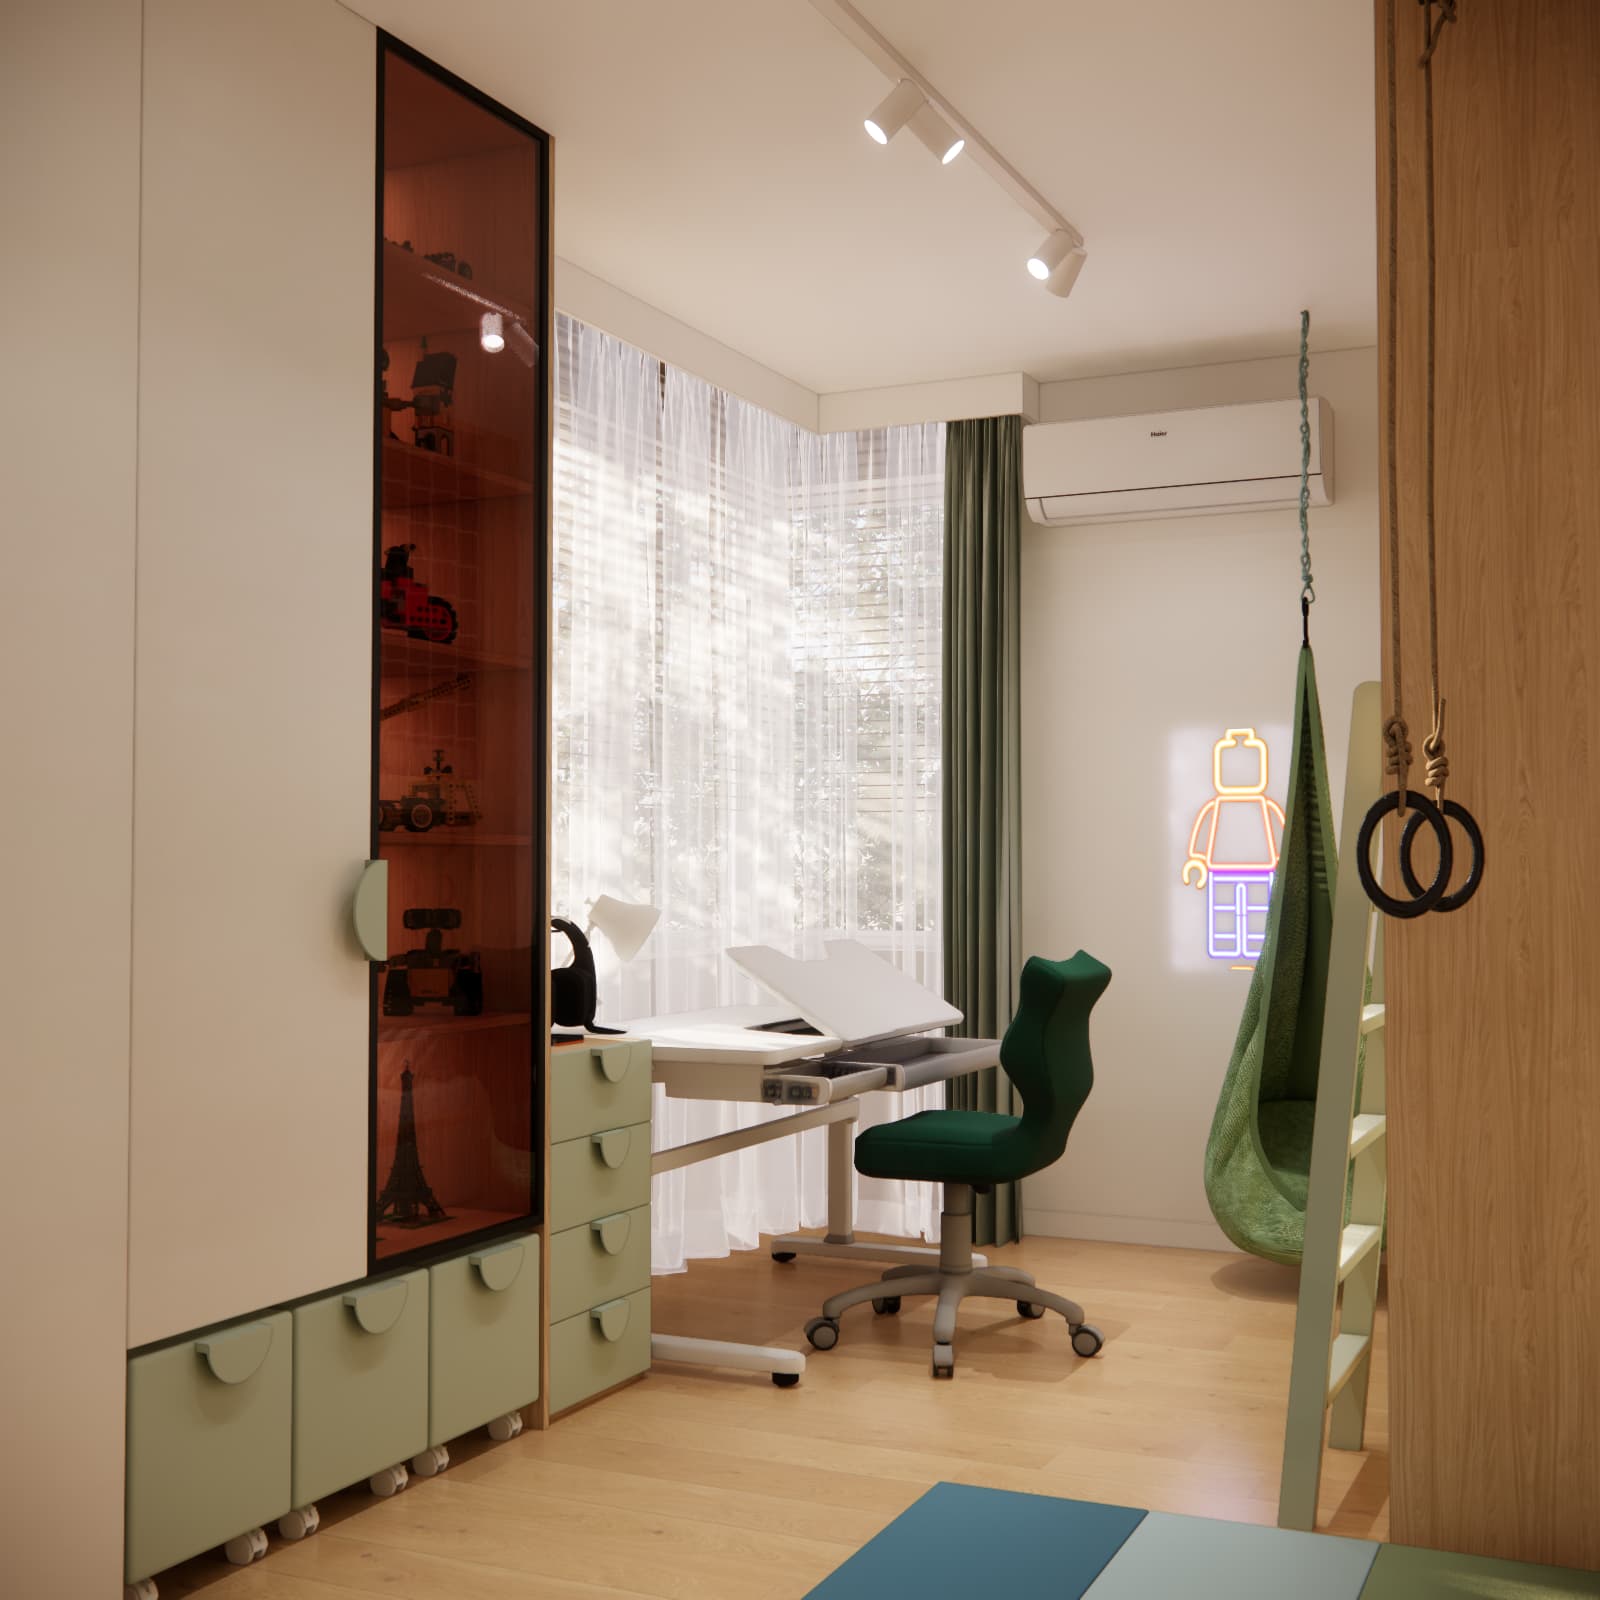
The study area features a white desk with a tilting desktop section and a chair in a deep shade of green. Nearby drawers provide somewhere to put away stationery without taking up the work surface. Sheer curtains and green drapes connect this part of the room with the rest of the design.
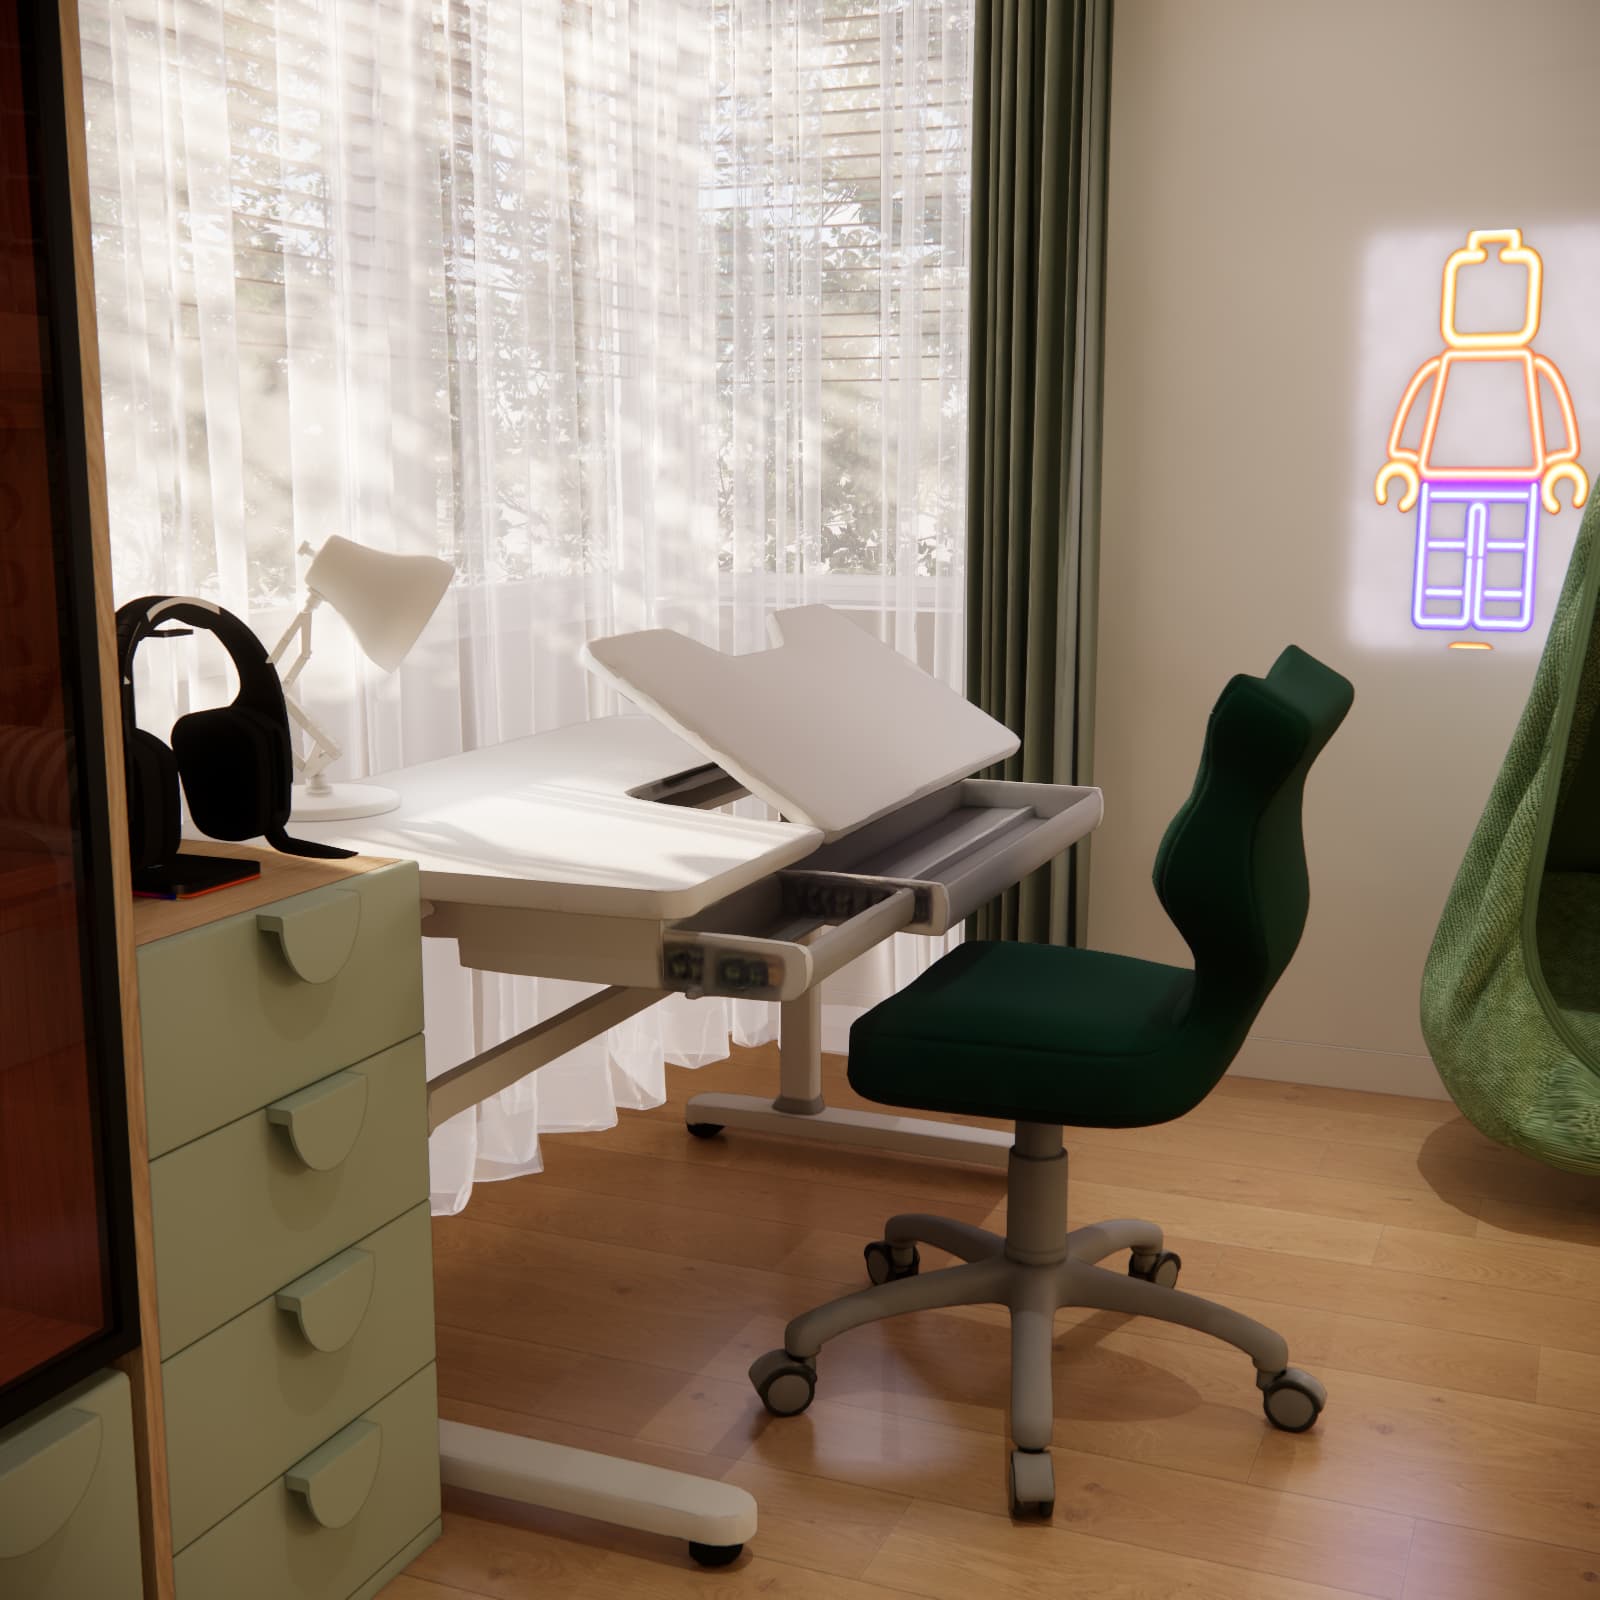
When choosing a desk, the key is to match it to the child’s height and the way they work. Check the adjustment range of the specific model, legroom, foot support and whether the chair can be pulled in comfortably. A tilting desktop can be useful for drawing or reading, but it does not replace the correct setup of the workstation as a whole.
The window provides daylight, while task lighting is needed after dark. Position the desk lamp so that the child’s hand does not cast a shadow over the writing area and the light does not shine directly into their eyes. The design also includes a decorative illuminated figure outline, which adds character to the room rather than lighting the workbook.
Wardrobes and model display cabinets – two different storage needs
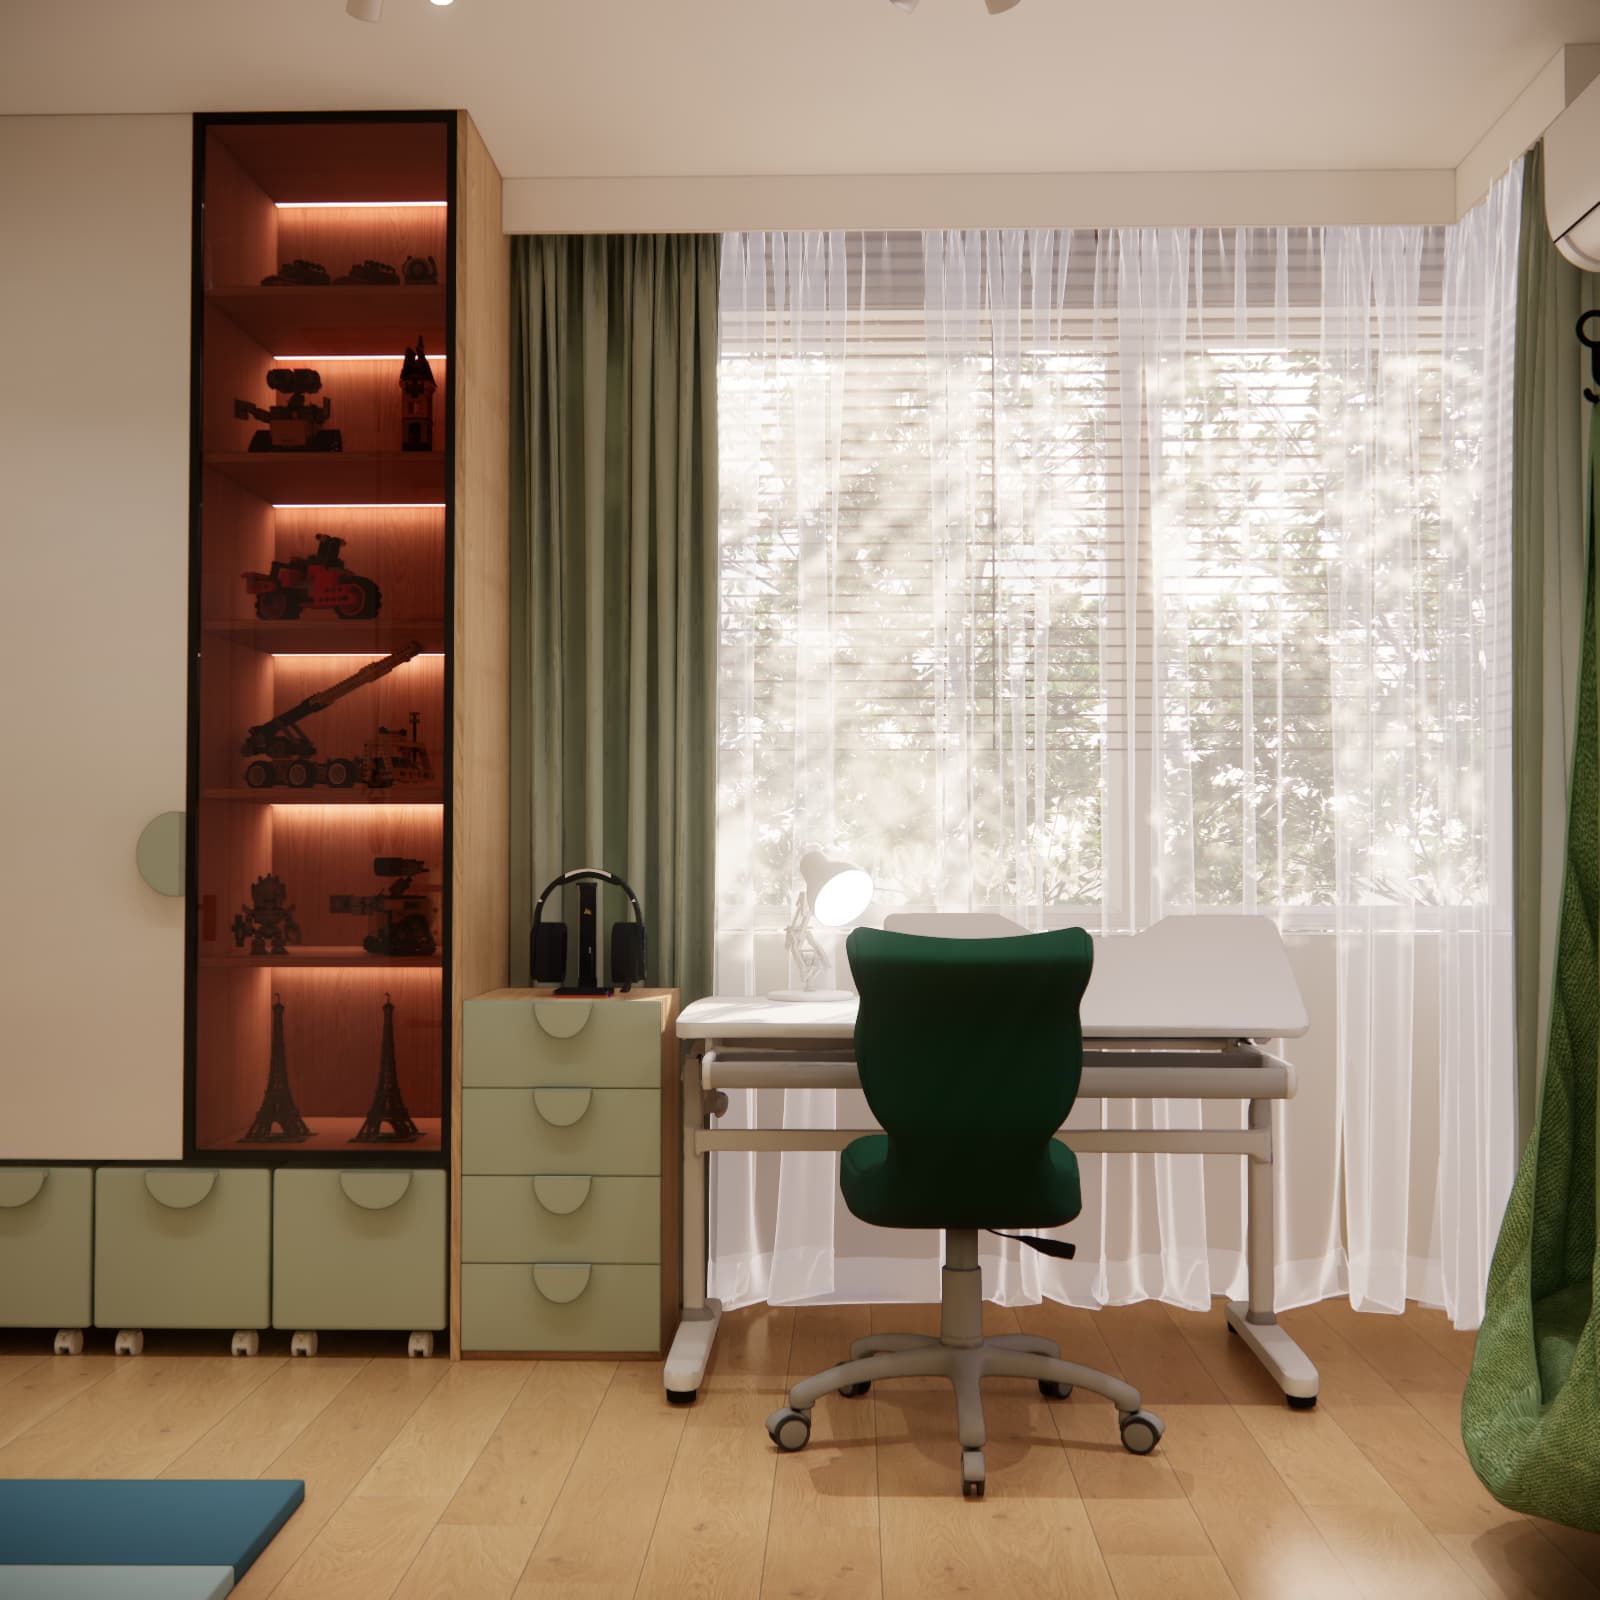
The light-coloured fronts of the tall wardrobes create a calm backdrop. Sage-green lower drawers and rounded handles echo the colours of the bed, access ladder and textiles. Repeating these accents gives the extensive fitted furniture a cohesive appearance.
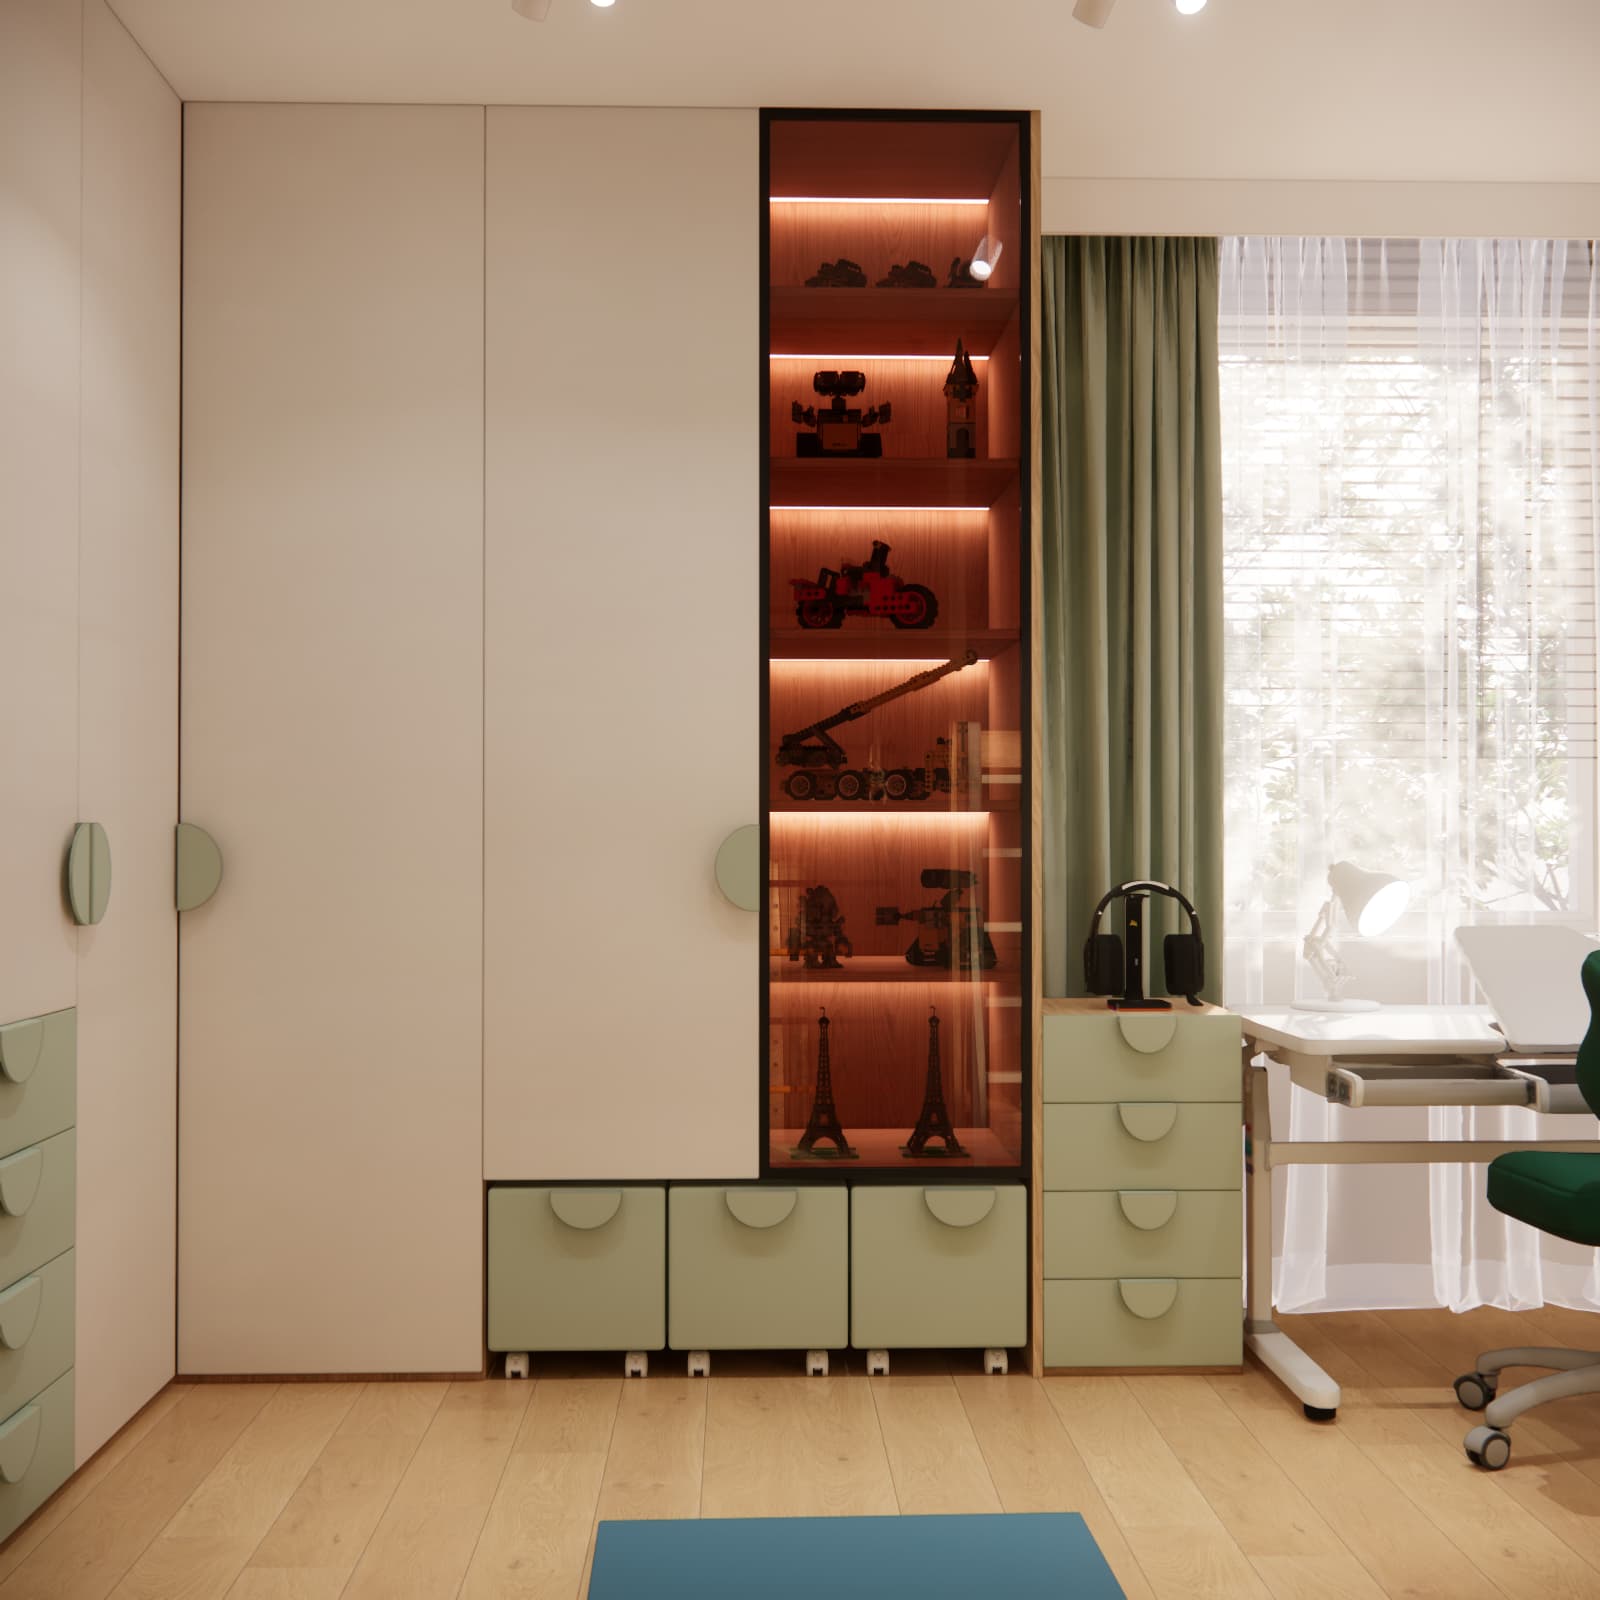
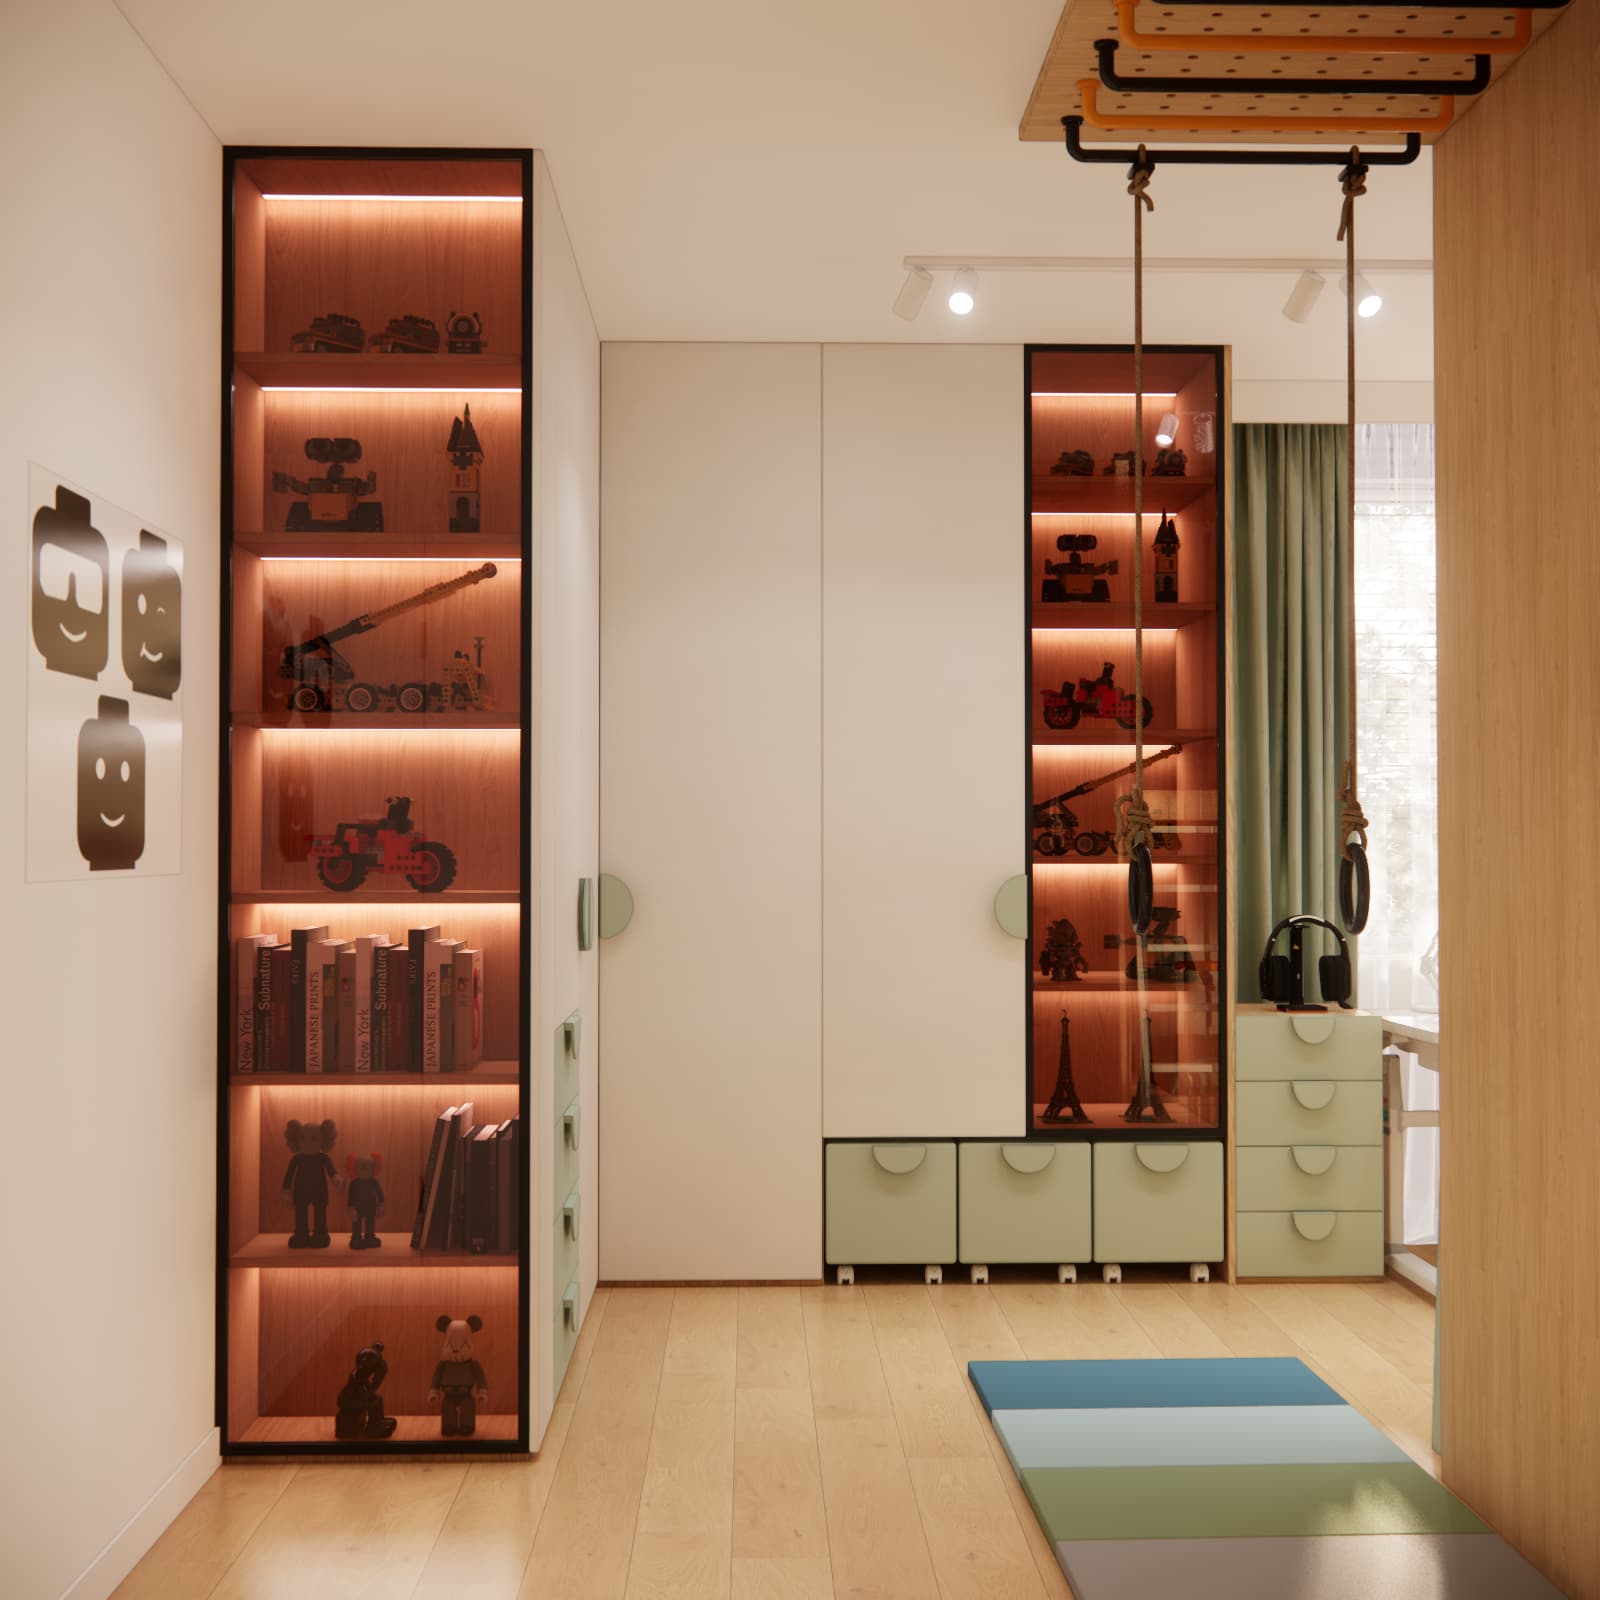
We created a dedicated space for models and figurines: tall glass-fronted display cabinets with dark frames and illuminated shelves. The collection becomes part of the decor, while other belongings can be concealed behind solid doors. When ordering display cabinets, check the dimensions of the largest models, access to the shelves and how the glazing will be cleaned.
A note from our team: everyday play and displaying completed builds call for different types of storage. Separating these functions helps keep the desk clear without putting every toy on display.
Sage green, light-coloured fronts and wood – how did we combine the colours?
The larger surfaces remain understated: the walls and cabinet fronts are light, while the floor and bed structure feature warm wood grain. Sage green appears in several places, tying the interior together. The darker chair and hanging pod add depth, while the yellow rungs introduce a more energetic accent.
The room’s playful character comes from the details: building-block-inspired decoration, figurines, models and the travel theme on the upper level. There is no need to repeat a single pattern on every wall. Here, the child’s interests are visible while the overall backdrop remains calm.
We planned the lighting in several layers. White ceiling spotlights provide general lighting, a separate lamp supports desk work, and lighting within the recess and display cabinets highlights selected parts of the interior. The option to switch them on independently is worth planning before electrical work begins.
How do you budget for a 15m2 room with a loft?
The budget for a room like this should start with a list of components and work required, rather than floor area alone. Two rooms measuring 15m2 can involve very different costs. In this design, the two-level structure, tall fitted furniture, display cabinets and active play equipment particularly require individual quotations.
We do not provide a construction and furnishing cost for this design, as we are not presenting an approved cost estimate. The visualisations do not specify every material, fitting or fixing, or the scope of work required in the existing room.
| Budget category |
What should the quotation include? |
| Design |
The selected package and required scope of documentation |
| Two-level built-in structure |
Structure, finishes, access, safety features, delivery and installation |
| Wardrobes and display cabinets |
Dimensions, front materials, internal fittings, glazing, hardware and lighting |
| Freestanding furniture and furnishings |
Desk, chair, mattress, lamp and textiles |
| Active play area |
Climbing ladder, rings, hanging pod chair, suitable fixings, mats and installation |
| Finishing materials |
Paint, wall decorations, panels and any flooring replacement |
| Labour |
Surface preparation, painting, electrical work and equipment installation |
| Additional costs |
Delivery, carrying items into the property, dismantling existing furniture and waste removal |
| Contingency |
A separate allowance for unforeseen work and differences between quotations and final orders |
How should you allocate the budget and set a contingency?
Start by collecting quotations for the structure, essential furniture, study area and necessary work. Only after adding these together should you decide how much to allocate to decorations and accessories. Record the contingency as a separate item rather than treating it as money for extra purchases. Adjust its size to the condition of the room and the number of unknowns: existing installations and unusual fixings may require further checks.
As an example of the calculation alone, if confirmed quotations total PLN 30,000 and you provisionally allow a 15% contingency, the required budget will be PLN 34,500. This illustrates the calculation; it is not a quotation for this room or a universal market rate.
How much should you allocate to design and how much to the work itself?
The design fee is separate from the cost of furniture and renovation work. The scope of documentation should match the planned work, particularly where bespoke furniture or changes to installations are involved. We discuss these differences in our article on children’s room design prices and choosing a package. Check the current price in the service listing for your selected option.
What can be simplified if the cost exceeds your budget?
For comparison, it is worth considering a version with a simpler display cabinet layout, fewer decorative lighting features or some furnishings purchased at a later stage. Ready-made furniture can replace selected units if the dimensions are suitable. However, costs should not be reduced by omitting required fixings or structural safety features.
If the child’s room is part of a larger renovation, its budget needs to be considered alongside the costs of the kitchen, bathroom, other furniture and shared installation work. In this situation, a whole-apartment design allows the layout and furnishings of every room to be considered together. An apartment budget should not simply be divided equally per m2, as different rooms require different levels of fit-out.
FAQ – questions about a 15m2 child’s room with a loft
1. Is 15m2 enough for a desk, wardrobes and an active play area?
This design combines all three functions. However, what is possible in a particular room depends on its proportions, height and the positions of doors and windows, not just its floor area.
2. Will a loft work in every 7-year-old’s room?
No. The room height, the intended use of both levels, the structure and safety features all need to be checked, together with any user age requirements specified for the chosen solution.
3. What is beneath the upper level in this design?
The lower level contains a bed with cushions, green wall panels and lighting within the recess. It forms a separate resting area within the same built-in structure.
4. How should you plan a desk for a child starting school?
Choose it to suit the child’s height and check the chair position, foot support and space for stationery. In this room, the desk is by the window, with drawers beside the desktop.
5. Where can completed building-block models be stored?
A dedicated display cabinet or shelving unit is a suitable option. Shelf depth and height should match the models, while loose pieces are easier to organise in drawers or containers.
6. What colours were used in the Pruszków room?
Light-coloured cabinet fronts and walls are combined with warm wood grain, sage green and deeper green. Yellow and black accents appear in the active play area.
7. How much does it cost to create a room like this?
A reliable figure cannot be established from visualisations alone. Quotations are needed for fitted furniture, furnishings, materials, labour and installation, with the design fee calculated separately.
8. Should delivery and a contingency be included in the budget?
Yes. Delivery, carrying items into the property and installation may be listed separately in quotations. Add a contingency to the planned total so that additional work does not use up funds allocated to essential furnishings.
9. Can some existing furniture be kept?
Yes, if it meets the child’s needs and fits the new layout. At the start of the design process, provide photographs and accurate dimensions, and indicate which pieces you would like to keep.
10. Can a room design for a home in Pruszków be ordered online?
Yes. At Fabryka Projektów, we work remotely. To prepare the design, we need a floor plan with dimensions and ceiling height, photographs of the room, and information about your needs, inspiration and planned budget.
Plan a room tailored to your child
In this Pruszków room, we brought together studying, resting, model displays and active play. What matters most, however, is adjusting the balance to the individual child: one may need a larger desktop, another more space for a collection or a larger open floor area.
If you would like to organise your ideas and see how they fit the dimensions of your interior, explore our bespoke online children’s room design service. Send us your measurements, expectations and budget, and we will create a design tailored to your space.